Showing posts with label Review Index. Show all posts

Thursday, January 24, 2013

Wrapping Up The Holidays

Felt ornaments, hot cocoa
For the most part, I stuck with her color scheme, but tried out some variations here and there

One last post pertaining to the holidays. These are so absurdly adorable though, I hope you won't mind!

I love giving handmade gifts and try my best to make special and personal things that people will actually appreciate or use. This year, along with some homemade marshmallows, caramels, and spiced bourbon, I picked out one of Alicia Paulson's felt ornments to make and include for each family's gift. It was one of those projects way down on my list that I'd always wanted to try but never gotten to before. Then, just when I was looking for something handheld to work on as I studied for finals before the holidays, I remembered them!

Felt ornaments
The red coat is by far my favorite. Now I just need one in my size.

I've got to say, I invested a lot of time in these little ornaments as each one progresses in a number of steps, but in and of themselves, no one technique is too complicated. Because of that, I think a beginner or more advanced stitcher could make and enjoy them. I drool over just about everything Alicia Paulson puts out into the world and have to give her big gigantic props for writing such clear and full instructions for these! Job awesomely done.

The key is really in having some patience and working on them a little at a time. And if you're making a ton of them like I did, you may also need patience from the rest of your household for overlooking the little pile of supplies that appear and grow next to your spot on the couch...

Thursday, October 25, 2012

The Needlecraft Style Directory

The Needlecraft Style Directory

I'm pleased as punch to share with you this peek at Sarah Whittle's new book The Needlecraft Style Directory. Sarah is a UK embroidery artist, founder of the Hand Embroidery Network, and the lady behind ArtyThreads. This is her first book and I have to admit I'm especially pleased because some of my very own work is featured in it! I've been waiting and waiting for it to be released here in the states to get a look at it and was floored to see my photos and stitch work featured on several different glossy pages—such an honor, thank you Sarah!

The layout is clean and lovely and provides a thorough and practical overview of almost anything you can do with a needle and thread (or floss or crewel or felt). The first half is split up into sections, each one providing a stylistic and historical introduction to a different type of needlecraft with examples of what kind of results can be produced with that technique—each photo from some of the best contemporary practitioners of embroidery today. The second half of the book is an illustrated stitch dictionary that details how to accomplish each technique from basic hand quilting and felting to goldwork, bargello, hardanger, and couching. You name the needlecraft, it's covered here.

The Needlecraft Style Directory
O hey, I think I recognize that stitching!

There are a lot of books providing basic embroidery stitch how-tos, but I haven't come across a contemporary compendium quite like this that takes you from freestyle line-based embroidery all the way to lace work, mountmellick, japanese darning, and hedebo techniques (are you drooling yet?!). I love that because I feel like a lot of the beautiful intricacies of different types of handwork have gotten a bit overlooked in our modern craft world where machine short cuts are valued over time well spent on handwork that is longer-lasting, more versatile, and (in my humble opinion) completely gorgeous and irreplaceable.

I always hear about craft books being for beginners and more advanced crafters and I have to say I think it's actually true in this case because it acts as a thorough entry point for beginners but also inspires more experienced stitchers with new ideas and ways of combining different techniques for a wider variety of project possibilities. It's an interesting presentation concept that gives you all the building blocks in one place which you can play with any way you see fit!

(here ends my LeVar Burton impression for today)


Tuesday, January 24, 2012

The Figure 8 Scarf

Figure 8 Scarf, AMH
Figure 8 Scarf made from Anna Maria Horner Velveteen and voile from her "Innocent Crush" line
(the earrings are from CoffeeandCream, another lovely little xmas gift that just happened to match perfectly)

I'm kind of in love with these ridiculous big scarves. Maybe they are already cliche...I don't know, but my internship is in an unheated library basement where there is no heat and I love these because they instantly dress up any old outfit and help to keep me o so warm. Since I've always had low-blood pressure, I can get that icy feeling pretty fast and am always on the lookout for accessories and such that make keeping warm not completely unfashionable!

The above is actually the second one I made using Anna Maria Horner's free Figure 8 tutorial, having gotten the fabric for Christmas (you can get kits here of velveteen and voile). The tutorial is clear, quick, and easy to follow, especially because of all the helpful pictures. Just be careful on the part where you are joining the ends together and hiding the seam. It takes some visualization, but then the technique makes perfect sense and is such a neat way of doing it!

Figure 8 Scarf, Nani Iro
Figure 8 Scarf made from double cotton gauze by Nani Iro and a solid voile from Anna Maria Horner

This is the first one I made before the holidays and it is o so soft in the double gauze and voile. It's a bit lighter and with more practical colors so I will probably get a little more use out of it. There is something to be said for getting to wear your favorite fabrics in such an effortless way I think! I might need to make one in every colorway I can think up...maybe some plaids in a soft flannel next?

Friday, November 25, 2011

Holiday wishes from Chewie and me.

Simon's Chewie

If you want to go right to my shop news about Black Friday or Cyber Monday, just scroll right to the end of this post!


When I first saw the pattern to make this little guy on pinterest, I knew exactly who it'd be perfect for—our friends just had a little boy three weeks ago and we wanted to do some small special thing for them to welcome him, although I would have made it even if they'd had a girl because we are all equal opportunity nerds around here! We were lucky to spend a relaxing and delicious Thanksgiving with these friends yesterday and I think he was a hit, despite perhaps that the little guy will appreciate him a whole lot more after he discovers where his own hands are. Phht, small detail you know.

He was pretty easy to make which was a relief since I'd never made a plush doll before and the PDF was well put together and easy to follow. There's just a few things I'll mention as a quick review of it in case you've stumbled across this post in search of pattern errata:

1. Most people who've made plushie dolls would get it, but since it was my first time, I did not realize that the wholes for stuffing the limbs could not be along the straight edge at the end of each one. You will need to leave those open AND another 5cm space along the length of the limb so you can stuff each one individually at the end.
2. This guy is kinda big. He measures something like 50cm tall which seems appropriate for a toddler but in hindsight, I would have printed the pattern to fit the page (US page that is, the PDF is a slightly larger standard UK paper size).
3. I skipped the flocked nose and glass eyes and went with the suggested felt for the face instead to make this Chewie more baby friend. In addition, I found some heavyweight nylon webbing to substitute for the ammunition belt as I didn't think the duct tape on grosgrain ribbon idea was going to hold up or be safe for a child. The webbing trim I found had the great little silver lines along the edge so we still got the desired effect I think and now, pre-washed and all, it can get slobbered on and carried around without worry.
4. To make the face a bit easier, I put each piece of felt down with a little Fabric-Tac glue and then hand-stitched each one with a backstitch using regular old mercerized cotton thread. SO much easier!


I hope you all also had a delicious and relaxing Thanksgiving! Here's a little thank you from me to you:

**Black Friday–Cyber Monday Etsy Shop Offer**
And before I go, I just want to let you know that there is FREE SHIPPING on domestic orders (not applicable to embroidered shoes or any other custom order) in my shops from today through Monday. Just enter the coupon code (FREESHIP11) upon checkout in any of my three stores:
the story of kat
gechichtenvonkat
purls and lace

Monday, October 24, 2011

How to: Quick and Dirty and Transfer Method

A dream is a wish your heart makes...

What better way to avoid finishing my eight page paper than to write a blog post instead? Sounds like perfect sense to me as this way I can get something important done and procrastinate at the same time plus I really am still writing so it's not completely unrelated...right? I feel like I have just discovered a loophole I shouldn't have and it is awesome, muahahaha!

But foreals now, the paper is pretty much done except for some editing and due tomorrow so I feel good about it and find that I am relishing my time blogging and crafting ever so much more these days as it is time that has become all the more rare and precious to come by.

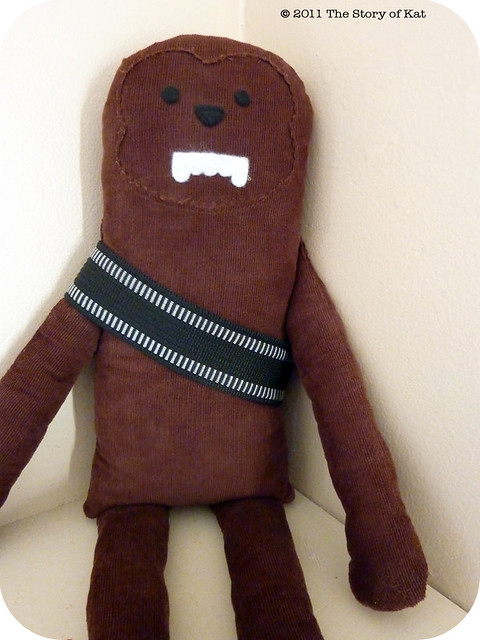
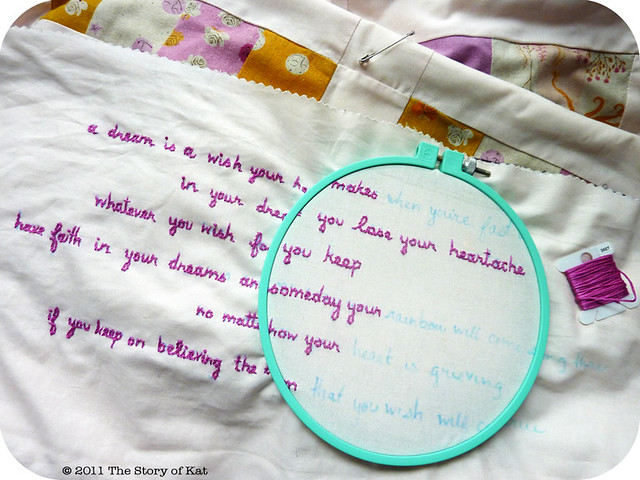
One of the things I've been working on a bit each night is this embroidery that I am doing on the back of the FFAII quilt for my niece (seen here, here, and here). Of course the thought occurred to me just as I was about to start quilting the thing and the only quote that seemed perfect was this rather lengthy bit from the song in Disney's Cinderella...a perfect lullaby for a fairy tale themed quilt I thought and I placed it so that she'll see it on the edge of the underside every time she pulls it up around her. If I can't be there in person, at least this will be!

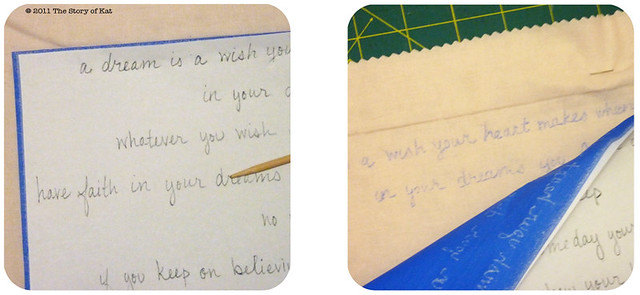
I copied it out using my own handwriting, scanned and adjusted it a bit on the computer to make sure it was lined up and would fit in the desired area, and then transferred it the quick and dirty way using wax free transfer paper from Seral (it's the best wax free stuff I've found and works on wood, paper, and metal too, but I'm dying to try the non-chalky carbon type). Now I will admit this is not my absolute preferred method but it was already dark out at the time so tracing was not an option for me (someday I will have a lightbox...) and I just didn't feel like working in the pristine way needed for the permanent  iron-on transfer pen. In such cases, it's the fastest and simplest method I've found. Here's how:

1. Place the textile or whatever item you are transferring to on top of a flat hard surface as this will ensure the clearest and darkest marks. Then line up your design where you want it and place the transfer paper between them, colored chalk side down.

2. You can use a pen or pencil to trace over your design but if you're concerned about being able to use it again, use a tracing stylus. A knitting needle is also a much cheaper and handier option that I have found to work quite well!

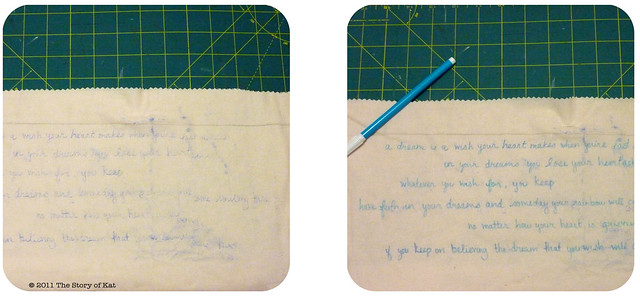
3. The more you're able to keep your arm up off the paper, the less chalky marks you'll end up with although they will disappear as you start handling it. If your design is small or you're going to be finished with it quickly, you're done at this point.

4. If your design is larger like mine and you're going to be working on it over a period of time, I like to use a water soluble fabric safe marking pen (Dritz makes a variety of them) to go over my design which gives it a bit more definition and gives you something more lasting to go off of as the transfer paper marks fade. As you can see in the very first photo of this post, I like to adjust as I go and any of those extraneous blue marks come right out with a bit of water when you're done.

Quick embroidery tip: after wetting your finished embroidery piece, ALWAYS allow it to air dry and ALWAYS iron it from the back side only. It's a simple precaution to take but will ensure a longer life and will keep the iron from crushing down the stitches you just worked so hard on.

Tuesday, June 28, 2011

Review Index

Occasionally I find a tool, pattern, or resource that I really love and have gathered up links to all my reviews for you here to peruse. Some are more in depth than others but I always present my honest opinion on only things that I have used personally and will share any errata I may have come across in the process as well as pros, cons, tips, tricks, and value. Enjoy—I hope this will be of help to you in your next craft or cooking related purchase or endeavor!

Tutorials and Patterns
Fabric Covered Bulletin Board
Made by Rae Spring Ruffle Top on Sew Mama Sew 
Made by Rae Lickety Split Bag
Draw! Pilgrim's  Star Wars Softie Pattern: Cuddly Chewbacca
Anna Maria Horner's Figure 8 Scarf 
Alicia Paulson's Felt Ornaments

Art and Craft Materials
Seral Wax Free Transfer Paper

Art and Craft Books
The Needlecraft Style Directory by Sarah Whittle

Independant Business Guides
The Boss of You by Lauren Bacon and Emira Mears
The Anti 9-5 Guide by Michelle Goodman

Cookbooks
Good Food to Share by Sara Kate Gillingham-Ryan