Showing posts with label crafting food. Show all posts

Thursday, September 1, 2011

Crafting Food: Prickly Pear and Papaya Freezer Smoothies

prickly pear and papaya smoothies
Cheers to the last days of summer

I like to fill out a summer meal with a fruit smoothie as they're cool, refreshing, surprisingly filling for a drink, easy on a weeknight, and a healthy alternative for that ice cream craving. The challenge is that fruit can be expensive, difficult to keep fresh for whenever the craving hits, and a pain to chop up on a busy hot night. Because of this I wholeheartedly rely on the freezer method as it streamlines the whole process (and frozen ingredients create a better smoothie texture anyways). It's all about the prep work beforehand so I wait until fruit goes on sale or when it's super fresh at the farmer's market, chop it all up right when I get back home (which is manageable if you make some time on the weekend), and freeze it in individual sandwich size ziploc bags. Each ziploc contains an equal mix of fruit so I can just pull a frozen bag out when I need it, toss a couple other items in the blender, and wahlah: two large (or three tumbler sized) smoothies!

My go to version is the classic strawberry/banana/orange juice combo but recently I found some discounted and unusual fruits at our grocer. They don't come in stock often and make for a great flavor combo, so I made my move. If you can't find these at your grocer, fill up a bag with whatever combination of fruit you like and add the other ingredients listed below, changing up the flavors (but not the amounts) of the yogurt, sorbet, and juice ice cubes to complement them.

papaya

Prickly Pear and Papaya Freezer Smoothies
(makes 4 ziploc bags full/8 smoothies)
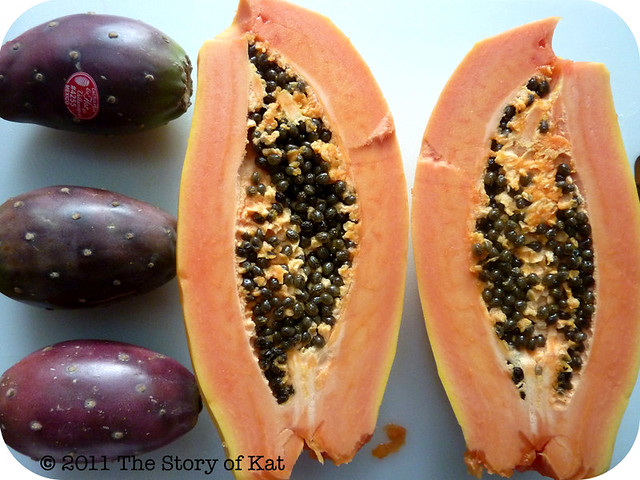
1 Papaya
(remove skin with potato peeler, scoop out seeds with a spoon, cut into big cubes)
4 prickly pears
(remove skin with paring knife, quarter and scrape off seeds, slice into big chunks)
4 bananas
(remove peel and slice into 1/2 inch medallions)

Divide the papaya equally among 4 sandwich size plastic bags. Add in 1 banana and 1 prickly pear to each, seal, and freeze. These can be frozen for up to 8 months but I don't think we've ever taken that long to use up our smoothie ingredients.

prickly pears
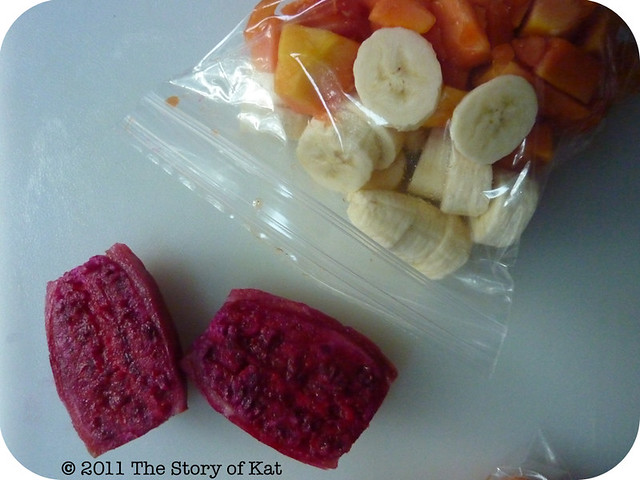
The inside of prickly pears can be yellow, orange, or deep red like these.

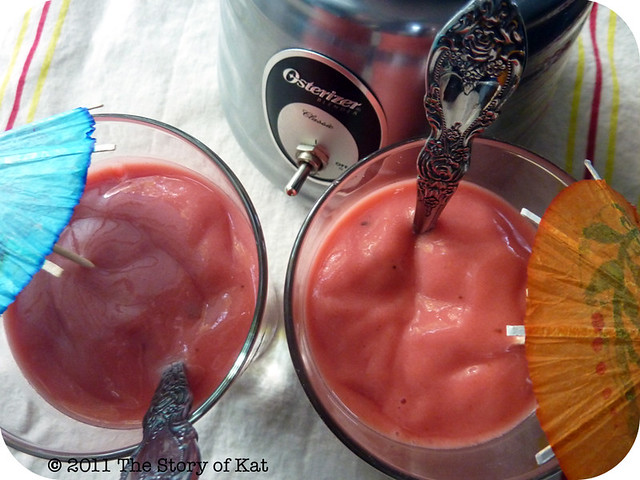
When you are ready to make some, take a bag from the freezer and let it thaw just until the fruit begins to separate from each other. Most days, I just zap it on defrost mode in the microwave for 10–20 seconds so that it's still frozen, but not as hard as a rock when it goes into the blender. Once ready, add to the blender:

1/4 cup yogurt
(Avoid those fake sugary ones—I like Glen Oaks drinkable low-fat yogurt with probiotics for smoothies as they have a ton of complimentary flavors but you can use just about any.)
1 cup mango sorbet
(which is naturally fat free!)
3-4 guava juice ice cubes
(you can find affordable tropical juice flavors in small cans in the Mexican grocery isle. Just freeze it in your ice cube trays, transfer to a ziploc, and pull some out whenever you need them.).

Blend thoroughly and serve immediately. Pad yourself on the back for making friends with your freezer and revel in how delicious being thrifty, organized, and healthy can be!


A note on prickly pears...
Also known as cactus pears, these little guys have a ton of antioxidants in them and are crazy good but they are full of seeds. You can scrape them off the flesh, some will break up if blended thoroughly, and they are completely edible if you just swallow and do not try to chew them...it's up to you. The fruit tastes so incredible and is such a fun food that I don't mind dealing with them one way or another. If you get them from the store, they will likely be removed of any prickly outer thorns (hence the name) but be careful if you are harvesting them from the cactus itself!

Thursday, June 2, 2011

Crafting Food: Skillet Cabbage

Skillet Cabbage
 The cabbage starts out purple but will run to pink once the lemon juice is added—beautiful and delicious
but be careful you do not get pink spots on your tablecloth. Not that I know anyone who did that...

It's been a while since I've posted a recipe, mostly because we've been relying on old favorites and leftovers for the past month so that I could concentrate on getting ready for the show (which is just two days away now! holy rocks batman!). I'm always looking for new ways to make vegetables interesting though and this little dish saved my lunch several days running.

Perhaps the best nutritional advice I ever got was that the more color there is on your plate, the better (that is, not in reference to artificial dyes and confectionery delights) since a wide variety of colors indicates that you are getting a wide variety of nutrients with dark leafy greens of purple and green being the most nutrient dense choices. Since it's so easy to end up with a plate of brown fried/starchy/baked carbo goodness, I've found this advice has really come in handy when it comes to meal planning and making healthy but tasty(!) choices.

So when I was about to get some of my usual brussels sprouts at the grocery store recently and realized they were all out, I decided to wing it and get a red cabbage instead since it seemed like it would have a similar body and crunch once shredded. I almost always steam or roast vegetables but prepared it the same way I do the brussels sprouts (using less butter in an effort to make it healthier) and was surprised once again with how delicious a traditionally scorned vegetable can be with this treatment! Not too cabbage-y-y-y at all but savory and with a nice little kick thanks to the lemon and pepper. Since one head of cabbage can be served as a side for two dinners for the both of us or make up the whole of 3-4 lunches for me, it makes a pretty good showing for a 99 cent head of cabbage!

Edit: it's a large serving but I accompany it with only a cup of rice/pasta for a quick weeknight meal. You could quarter the cabbage into smaller portions for two people or use half the head to serve as a side for a more elaborate dinner of 4-6 people. This will also work with regular green cabbage which is even cheaper.


Skillet Cabbage
1 head red cabbage
1/2-1 TBLS unsalted butter
1/2 fresh lemon
course ground kosher salt
freshly ground black pepper


-Divide your cabbage into halves or thirds, depending on how many meals you'll need it for. Shred the designated portion with a large chopping knife or food processor (I prefer the courser bits the knife will give you) and refrigerate the rest. Cabbage, even after being cut, will keep a bit longer than other vegetables so there's no need to worry if you don't want to eat the other portions several nights in a row.

-About halfway through shredding, place your pat of butter in a large skillet over medium heat. If preparing it in halves, use 1 tablespoon of butter. If preparing it in thirds or quarters, use just a 1/2 tablespoon.

-Place shredded cabbage in the pan and quickly toss to coat with butter. Add salt and pepper to taste and turn heat up to high.

-Continue to toss and cook for 1-2 minutes or for desired tenderness. I don't like to go any longer than a couple of minutes because I like to have a lot of crunch and avoid the wilted stewed effect. Remove from heat and in a bowl mix with 1 TBLS fresh lemon juice (about half a lemon). OPTIONAL: sprinkle on slivered almonds as a topping.

BAM! you're done! That was relatively painless right?
Plus, you can't beat cheap + tasty + nutritional so proceed to plate that goodness up and devour.

I'm having the last of mine for lunch today and will then proceed to busy myself in tying up some loose ends for the festival this Saturday (insert much excitement, nerves, and crazy panic here). If you're in the downtown Providence, Rhode Island area I hope to see you there! If not, I'll see you back here on Monday with photographic evidence of how it all went!

Friday, January 21, 2011

crafting food: cheddar ale soup

cheddar ale soup

so what do you do when you've had a rough week, you've got 20 some odd inches of snow on the ground with 7 more falling, and you don't have the cash on hand to escape to some exotic local? well, um, if you're anything like me, you might do a bit of CARBO-LOADING! yes, the caps are necessary today and yes, something along the lines of carbs! salty! chrunchy! cheesy! goodness! in my belly! sounds like just the thing right about now (me, an emotional eater? bah, what is this you speak of?!)

we made this wonderful cheddar ale soup recently, compliments of williams-sonoma, and it really hit the spot. as usual, i changed a couple things so i will just list them below in italics (the rest being the original recipe, slightly paraphrased in kat-speak).

Cheddar Ale Soup
Serves 6

Ingredients:
1 bacon slice per bowl/person (we usually go with low-sodium but turkey bacon would be a great healthy alternative too of course. or, just leave out and wah-lah: vegetarian friendly.)
2 TBLS unsalted butter
1 large yellow onion, diced
2 carrots, peeled and diced
3-4 garlic cloves, minced
1/3 cup all-purpose flour (you can substitute whole wheat flour if you like)

1 cup pale ale
(make sure it's one you really like as the taste comes though quite strongly and i made the mistake of just using whatever we had in the fridge...oops)
1 TBLS worcestershire sauce
2 cups milk
2 cups chicken broth
(you can use stock too, i had some homemade turkey stock i'd frozon from thanksgiving and it really gives it a great depth of flavor! substitute vegetable stock for vegetarian version.)
1 1/4 lb. sharp cheddar cheese
(we used a combination of inexpensive sharp cheddar from the grocery store and some gourmet vermont cheddar....holy awesomeness batman!)
kosher salt and freshly ground black pepper, to taste


Directions:
in a 4 1/2 quart dutch oven (um, yeah i wish i had one of those..my stock pot sufficed) over medium-high heat (bacon is crispier if cooked on lower heat, i usually go with medium), cook the bacon until crisp and then transfer to a paper-towel lined plate to drain while you move onto other things.

discard all but 2 TBLS of the fat in the pot (that's about all i had actually). reduce heat to medium and melt butter. add the onion, carrots, and celery, cover and cook, stirring occasionally, until the vegetables are softened, about 20 mintes (20 minutes was too much for mine as they got a little black despite stirring. all stoves are calibrated differently so just keep a careful eye out).

add the garlic and cook for 1 minute.
add the flour and cook, stirring occasionally, for 3-4 minutes.
add the ale and cook, stirring constantly, for 2-3 minutes.

add worcestershire, milk, and stock, increase the heat to medium high and bring to a simmer. then reduce heat to medium-low and simmer for 10-12 minutes. remove the pot from the heat and puree the soup with an immersion blender until smooth (yes, that would have come in handy but no immersion blender here. i pureed the soup in my regular old blender once it had cooled a bit but it was so full that it was difficult to keep the lid on. next time i will just use the food processor like a smart person).

return soup to pot on medium-low heat and add cheese by the handful, stirring constantly; do not allow the soup to boil. season with salt and pepper to taste and then ladle into bowls. top of with the crumbled bacon and, instead of croutons, serve with large hunks of freshly baked bread to rip off and dunk in your soup! i'm thinking a bread bowl might not be a bad idea next time...

add:
1 part Masterpiece Theatre's Downton Abbey on PBS
1 grandma's quilt
2 sleeping cats curled up around you
=start feeling like maybe the world is not half as rotton as it felt the day before!


edit: i was just reading that tomorrow (January 22, 2011) is National Soup Swap Day...what a neat idea to try sometime or anytime during the colder months! i'm sure you could even work in a charitable component...hmm, must let this one simmer in m' brain for a bit!

Friday, January 7, 2011

Crafting Food: Garlic Hummus

garlic hummus

I am hunkered down with a few pairs of custom embroidered shoes for the next few days so I thought I would share a tasty recipe with you in the meantime. This is my own recipe for garlic hummus, a middle eastern dip made with chickpeas.

You can cut the recipe in half if you're just making enough to go with a normal meal. I use two cans of chickpeas here as I usually make it for parties. Serve with torn up bits of pita bread, pita chips, or even crostini!

Warning: I am kind of a garlic freak so the taste really comes through here. Try just 3-4 if you prefer less and try a few extra shakes of the cayenne pepper if you like lots of heat as the 5-6 shakes listed here will just give it a bit of a kick. Chickpeas are a great source of protein and can carry other flavors and spices very well so don't be afraid to customize it to your own tastes!

INGREDIENTS:
2 15oz. cans chickpeas, drained and rinsed
4-6 cloves garlic
1/4 cup extra virgin olive oil + some for drizzling
fresh squeezed juice of 1 lemon
3 TBLS tahini (sesame seed paste you can get at the store)
5-6 shakes cayenne pepper
1 tsp. parika + some for garnish
1 tsp. cumin
1 tsp. kosher salt


DIRECTIONS:
Combine ingredients in a food processor, adding liquid a bit at a time as you go, until creamy. Sprinkle with paprika and drizzle with extra virgin olive oil. garnish with a sprig of parsley. Enjoy!

Monday, November 22, 2010

crafting food: baking powder biscuits

baking powder biscuits
a good rule of thumb: if it involves a honeypot, it's probably going to be a beautiful thing.

one of my favorite fall traditions is sitting down with lord of the rings (the books or the movie) and a big bowl of stew. i usually serve this with apple cider and homemade baking powder biscuits which are so scrumptious with a touch of butter and honey!

here is a family recipe i use to make these very simple biscuits that are a great compliment to hearty sunday night dinners:

Baking Powder Biscuits
Makes app. 10 biscuits
Preheat oven to 350 degrees

Sift together:
1 1/2 tsp. salt
3 cups flour
4 1/2 tsp. baking powder

then add:
6 TBLS. shortening
1 1/4 cups milk

biscuit cutters
i love my antique biscuit cutters but you can also use an upside down drinking glass
with a little flour on the edge to cut out your dough.

mix together and roll out at app. 1 inch thick. cut out circle shapes for biscuits and place on baking sheet. bake at 350 degrees until lightly browned and fluffy (if i recall, you can check them at about 10-15 minutes and go from there).


see, i told you they were simple!

Monday, June 14, 2010

crafting food: oatmeal bread (yum)


I spent part of my weekend making one of my favorite things: oatmeal bread! It had cooled down a bit outside and so I thought it'd be a perfect time to use the oven and bake up some delicious homemade bread...I guess i'm on a roll in the kitchen as of late.

My doctor told me a while back I have high blood sugar and with a history of diabetes in the family, it's become important to me to try and vanquish all the nasty chemicals, preservatives, and refined sugars found in the things we buy at the grocery store that make it so difficult to maintain a healthy weight. It's a seemingly uphill battle but investing in some whole wheat flour has helped me to make a lot of things at home as I'd much rather be baking and cooking than standing in the grocery aisle attempting to disseminate misleading food labels.

Here is the family recipe for this very tasty bread:

(makes two loaves)

Combine in a large bowl:
1 cup rolled oats
1/2 cup whole wheat flour
1/2 brown sugar
1 teaspoon salt
2 tablespoons butter/margarine

Mix together dry ingredients and then add 2 cups of boiling water.

In seperate small bowl, mix together until dissolved:
1 package dry yeast
1/2 cup warm water

When oatmeal batter is cooled down to room temperature, add in yeast mixture.
Stir in:
5 cups whole wheat flour

Once dough is stiff enough to handle, turn onto floured board and knead for 5–10 minutes. Place in a greased bowl and cover with damp cloth. Place this in a draft free area and let rise once until doubled, punch down, then let rise again. Shape into two loaves and place in greased 9x5x3 pans to bake at 350 degrees for 30-40 minutes. Before popping them into the oven you can brush them with a bit of melted butter and sprinkle oatmeal on top.

Tada, homemade bread! Yum.

Sunday, March 21, 2010

crafting food: prosciutto flatbread


we took a long walk around the lake in town on saturday (it's about 5k i think!) and went grocery shopping afterwards so of course we were starving by the time we got home. luckily for us, we'd started some pizza dough the day before and let it ferment over night for some extra flavor so all we had to do when we got home was warm up the pizza stone and then pop the rolled out dough in for about 10 minutes for this lovely flatbread (apologies for the flash photos..blech i hate that light..but c'est la vive, i am always cooking dinner at night wouldn't ya know!). making flatbread is a DELICIOUS and easy way to feed your pizza craving, possibly even just a tad healthier since this recipe doesn't require any sauce and melty cheese. don't worry though, it's still completely mouth-watering to bite into!

once your flatbread is toasty and golden (pop it with a fork in a few places if it bubbles up while baking), slide it off the pan or pizza stone and onto a cutting board. you can make it like this (above) in the big circular shape of a traditional pizza pie or you can create small oval flatbreads for individual servings. we decided that next time we'll try making the bread into individual servings as they'll save you from having to cut slices, store better for leftovers, and help the toppings to stay put. also, i think this individual presentation would make them great party food as people could decorate their pieces any way they pleased!

we chose to scatter on handfuls of prosciutto, heirloom tomatoes, rough-chopped basil, crumbled feta cheese, a small drizzling of olive oil, and then topped off with some kosher salt and freshly ground black pepper. trust me on the black pepper...seriously SO GOOD! you can use all kinds of toppings though like arugula, fava beans, different cheeses, and so on.

wa-lah(!):