chocolate + jadite = bliss
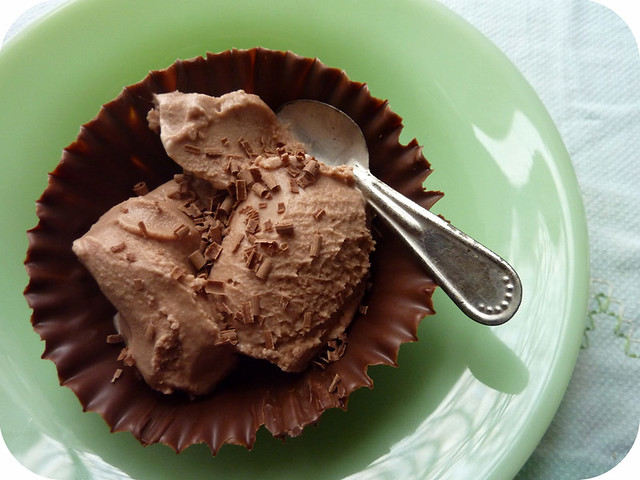
the piéce de résistance of my birthday weekend was this chocolate-hazelnut gelato, spooned into these molded chocolate bowls and golly gee it was the most frigging divine thing i've had in a while!
we had made this same nutella flavored gelato to compliment our pie and coffee at thanksgiving with our handy kitchen aid ice cream mixer attachment and i decided to make it again and spruce it up a bit once i saw these on pinterest (if you have not yet gotten addicted to pinterest, do yourself a favor and get on that).
but the more i read about the ins and outs of making your own chocolate bowls with semi-sweet chips and balloons as molds here and here, the more nervous i got about how sadfrustratingwasteoftimeandchocolate it would be if/when the balloons popped and my bowls right along with them. i also had the designsponge peanut butter cups on the brain while at the craft store when i had the idea to use half dark chocolate/half peanut butter candy melts and jumbo muffin cups as molds, eliminating the need of volatile balloons and taking advantage of the fact that these candy melts are made for melting/hardening/molding. i looked everywhere for jumbo silcone cups but couldn't find any and ended up buying paper cups instead....i was worried but needlessly as they worked beautifully! it turned out so well that i decided to take a few snapshots and share the process with you:
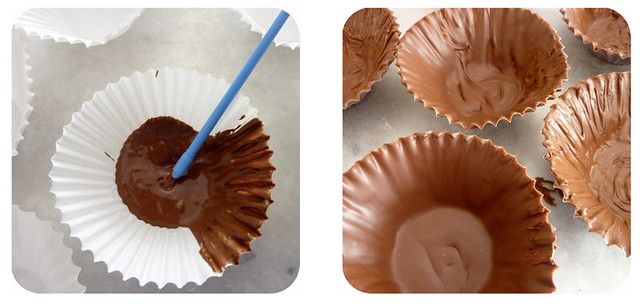
i started by laying out a baking sheet and lining it with a bit of wax paper just to be safe and tidy. then i melted together half of each bag of candy melts (i used dark chocolate + peanut butter but you could do just a whole bag of one or so many other combinations!) in a double boiler and spooned 1 1/2 to 2 heaping TBLS into each cup. this made enough for me to coat 8 jumbo muffin cups (ahem and just a smidge to lick off the spoon when i was done).
working quickly with a decorating brush, pull the chocolate up the sides making sure to thoroughly coat them so that no light shines through (light spots = weak spots). i had about 10-15 minutes to do this so grab a warm body to help you or melt your coating in smaller batches. they should start to set up by the time you are painting the last one but to harden completely, set them in the fridge for at least one hour (i was paranoid and went for two).
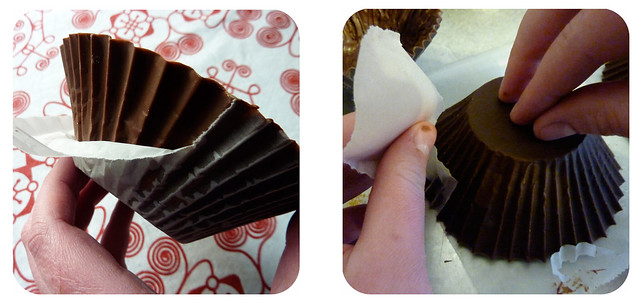
to the left is the wrong way to remove the paper cup, to the right is the correct way
once they've completely hardened, pull them out and set on the counter. do not pick one up and start tearing the paper down the ridges as this puts too much pressure on the chocolate (i say this having broken the first two this way). instead, you can gently get use a vegetable peeler to pull just a sliver of paper away from the ridge at the edge of each cup to get you started. then turn the whole thing upside down onto the baking sheet and gently peel the paper in a sideways motion across and around the ridges. i was happily surprised to find that it was easy to remove them this way without worrying about any stray bits of paper getting stuck AND without breaking them.
keep in fridge until you add the ice cream/mousse/pudding/whatever you like and then enjoy!
p.s. thank you to each of you for the warm birthday wishes, you guys are so kind and it means a lot to me! i did indeed have a nice little weekend but also seem to have developed a nice case of seasonal allergies (or maybe a cold? both?) which i'm finally going to stop ignoring. hence, i am writing this from the couch and am crossing my fingers that i will be back in action soon. blurgh.


4 comments:
OMG...yum, yum, yum...like to infinity and way beyond!!! That looks so incredibly good!! I love Nutella. I grew up eating it in Canada, but then kind of lost touch with a bit as I got older, until last year when we were in Italy... it was everywhere and I've been hooked again ever since. So glad you had a nice BD...and sorry to hear you aren't feeling well...blech!
Hope it passes soon and you'll be all back normal. :-)
How dare you post this while I'm doing weight watchers! Looks fantastic - and everyone deserves one on their birthday :)
I can't believe you made those beautiful things! That is a seriously good way to wow some dinner guests. Thanks for the photos.
Wooo those look awesome! Good job!
Post a Comment