Showing posts with label hand embroidery. Show all posts

Thursday, January 15, 2015

New Shop Page! New Patterns!

New Patterns
New Patterns in my Word Series: Octobers and Bastards


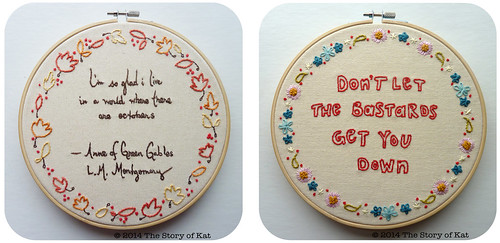
I have not one, but TWO new patterns to introduce today, and I gotta tell ya, I think they're pretty wall worthy!

The pattern on the left is called "Octobers" and features an all too true quote from one of my favorite storybook characters—the one and only Anne Shirley from L.M. Montgomery's Anne of Green Gables books. The second one is called, of course, "Bastards," and features a sentiment of an altogether different (yet no less wonderful!) note. Really though, I can't tell you how many times I think this to myself on a weekly basis and how much I HAD to make it into something that could go onto the wall of my home office.

I now have a shop page right here on my blog! You can find A FAQ section at the bottom of the shop and can just click on the images to see more details, then purchase and download the patterns. Checkout is made easy using PayPal and the Payhip platform. Patterns will be immediately available via download link. Easy, right? My hope is to consolidate everything under one shiny new website of my very own soon, but until then, this allows me to continue making my patterns available despite the new EU VAT law that etsy has not responded to.

I won't get into too much detail but, as many in the etsy and crafting community already realize, the new EU VAT laws have a vast reach and big effect on anyone selling digital goods via the internet, regardless of where they are based (and as of 2016, the law will affect physical goods sold online too). Shops are not expected to pay the VAT taxes, but everyone who sells to the EU has to register and track them for customers in the EU who are responsible for paying them. There is no threshhold for micro-businesses like me, and since we simply do not have the resources to comply, we rely on e-commerce tools from third-parties like Etsy to ensure we are in compliance. For that reason, I have had to remove my patterns from my etsy shop.

And if you've read that far, please reward yourself—The first FIVE customers to use the code THANK YOU to purchase either one of these two new patterns, will receive 20% off! Because seriously guys, I really am grateful for your support while I work on my new website and offerings!

Tuesday, December 16, 2014

New Series, New Pattern: DIY Embroidery

DIY Embroidery: The Word Series


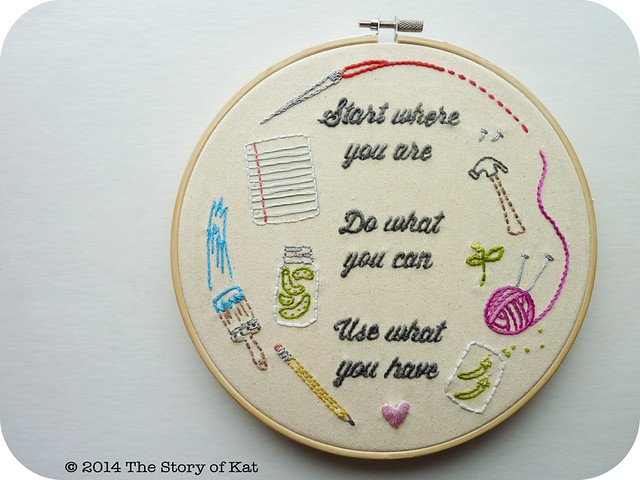
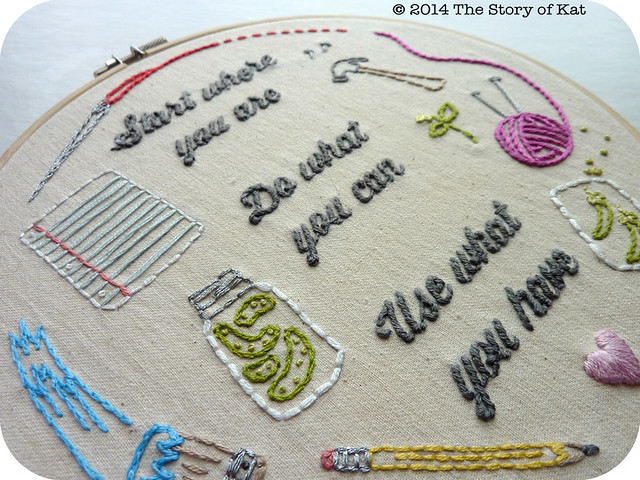
For a while now, I've been wanting to find a way to combine some of my favorite collected quotes and typefaces with my embroidery work. A few months ago, a brainstorm hit and I set to sketching out my ideas for a new series of embroidery patterns that feature text in a whole new way. This is the first pattern in that series and I'm thrilled to finally be able to share it with you all!

DIY Embroidery (detail 1): The Word Series: The Story of Kat


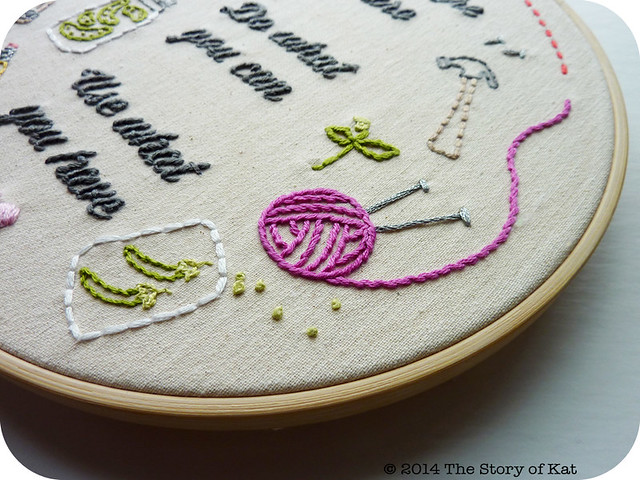
Advice, without personal context, can be overrated. It's important to me that this series not be about preachy advice but rather inspiring and powerful words.  When I come across a phrase, thought, or quote in a book that stands out from all the noise, it can help spur me on to take then next steps forward. I relish in the power of the written word—the strength, humor, warmth, or empathy it can impart.

DIY Embroidery (detail 2): The Word Series: The Story of Kat


I hope you will enjoy contemplating the words and designs in this series as you stitch them up. They range from motivational to sarcastic and hilarious—each one drawn by me and digitized to be stitched up in an 8" embroidery hoop and ready to hang (or framed or worked into another sewing project however you like).

Check out my shop here to purchase this pattern as an instant download and keep your eyes on this space for the next two patterns in this series over the coming weeks (as well as some tutorials on stitching up text)! Each PDF includes the pattern in forward and reverse (depending on your preferred method of transfer), and comes with a guide for colors and stitches if you wish to replicate the pattern as I have stitched it up (though I love seeing the different creative directions you go in with them!) Feel free to tag your work with these patterns on Instagram with #thestoryofkat or add them to The Story of Kat flickr group here.

Tuesday, January 7, 2014

Into the Winter Woods

Into the Winter Woods

 It's a new year and I've got a new embroidery pattern for you! This one is called "Into the Winter Woods" and I hope you enjoy stitching it as much as I enjoyed creating it. Click here to purchase in my etsy shop where you will find more photos and details.

It seems a fitting time to release this one, what with the frigid temps and heavy snowfall across the country right now. We just shoveled ourselves out from a blizzard a few days ago after coming home from visiting my family in the midwest for the holidays and are now bracing ourselves to see if our mercury is going to drop that drastically as well. Sometimes winter can be downright rough, but it also brings with it lots of great sports, vistas, and opportunities for indulging in cozy cabin getaways and festive comfort food....definitely some of my favorite things that I could not easily get away with in warmer months.

Into the Winter Woods, detail

One of the things I'm trying to focus on in my patterns now is the ability for any novice stitcher to do them up very simply with basic outline stitches or for more intermediate to advanced stitchers to have a modern pattern they can really sink their teeth into. It can be hard to do that with a lot of the modern patterns out there, as adorable as they may be of course!, and so I had a lot of fun especially devising these show shoes for you as well as the little poof on the hat. It can be done with a simple french knot but if you are up to it and want to recreate the look I have here, you can try your hand at this "turkey stitch." Check back soon as I will be supplying a live link to my own tutorial for this stitch complete with lots of detailed photos for you.

In the meantime, happy stitching and happy 2014!

Tuesday, October 15, 2013

Kindred Stitches: Exclusive Embroidery Pattern

Vintage Bowls Hand Embroidery Pattern

The new issue of Kindred Stitches is now available and it features a hand embroidery pattern by yours truly!

Kindred Stitches is a new digital craft magazine available for download exclusively via the iTunes store for the iPad and iPhone. Because it is digital, it includes live links to this PDF pattern (and all the other projects featured therein), video tutorials, and places to shop for materials. I love how interactive and convenient that is. Just download the free Kindred Stitches app in the iTunes store and then choose a subscription or individual issues to purchase and download right to your iPhone or iPad.

Kindred Stitches, Issue Two

I was thrilled to be asked to contribute to this, their second issue, and had a lot of fun drawing the "Vintage Bowls" pattern to coordinate with their "retro vintage" issue theme. It brings to life the retro lines and designs of mid-century kitchenware in a handy printable PDF that you can apply to a simple tea towel or any other embroidery project you have in mind. Also included in the magazine are step-by-step how-to photos for each stitch and a floss color guide so it is beginner and intermediate friendly. Feel free to stitch it up in the same colors I've used or customize it to match your own kitchen or a friends—the choice is up to you!

Vintage Bowls Hand Embroidery Pattern, WIP detail
"Vintage Bowls" hand embroidery pattern WIP

This issue also includes an interview and gallery of my work—I'm flattered to have been asked by the lovely ladies at Kindred Stitches and really hope you all enjoy the magazine and my little contribution!

Tuesday, September 24, 2013

The City Set

City Set Embroidery Pattern
The City Set pattern, detail

I moved around a lot in my twenties and found myself loving life in the center of a few bustling cities. Walking to work with a steaming cup of hot coffee from my favorite cafe, navigating traffic and construction as vespas whizzed by, admiring all the different architecture, accents, and food smells. Working late and ordering chinese food, taking sunday walks and reading on park benches. There is nothing quite like it!


I wanted to capture those memories in this pattern and also try out something that was a bit more modern and urban, but still in keeping with the charm and detail of my other patterns. I started sketching all of it out early this summer and the pattern is now available in my shop!

And some other good news: thanks to a new feature on etsy, all my individual pattern listings can now be downloaded as soon as you pay for them. Instant shopping gratification! The PDF includes an example, a forward and reverse pattern, a color suggestion guide and chart, as well as instructions for my three favorite (and most dependable) transferring methods. 

City Set Embroidery Pattern

Stay tuned— I have a couple more new patterns that will be available this fall and winter.
In the meantime, happy stitching!

Thursday, May 2, 2013

Airmail Needlebook

Airmail Needlebook

I had some of this duckcloth leftover from when we spruced up my husband's office last summer. I had dyed it with coffee as a background for some aquatic specimens he wanted to display resulting in a very sturdy and mottled looking fabric. Fast forward to this past winter when I got to thinking how much it resembled an old letter. I began stitching on it without a whole lot of thought about what it might become, just wanting to play with the idea of transforming it into a weather beaten envelope.

Airmail Needlebook

All the stitching was done with a satin cotton floss and the stamp itself is a little scrap of Liberty tana lawn (tacked down with back stitch and a smidge of Fabri-Tac along the edges). For the envelope design on the back, I simply used an actual envelope as my pattern.

After that initial thought, the project got lost in a pile of "to dos" until I came upon this fabric, Airmail Stripe in Garden by Suzy Ultman for Robert Kaufman Fabrics. IT HAD TO BECOME BINDING. IT JUST HAD TO! Poifection, right?! I wasn't yet sure if this would turn into a mini quilt, coaster, or draft for a larger quilt. Then along came my first foray into teaching embroidery classes this past month and I soon realized that a pin cushion was just not going to be something I could easily haul and keep track of on the go. A needlebook was the obvious choice!

Airmail Needlebook, Inside detail
Still thinking about how I might adapt this design idea to become a lap-sized quilt/embroidery pattern

I pulled the notebook paper fabric from my stash along with the white felt and voila—pocket storage and a place for pins and needles of all sorts! As a finishing touch I tacked the baker's twine into the binding and used it to the secure the book shut with a vintage button from my collection on the front. I love having something special to take to classes and hold my most treasured tools on the go.

Necessity is indeed the mother of invention! Do you have any projects that start with a burst, then sit on the back burner until you find a way to make it work another use altogether? Sometimes you just need to wait for that perfect fabric that makes all the difference in the end!

Thursday, February 28, 2013

An Embroidered Ketubah for Alicia and Jack

Ketubah

Before I say anything about this piece, I have to acknowledge the endless supply of patience and grace displayed by my friend Alicia, the bride who commissioned and helped design this piece. Holy moly cows batman, the girl is kind of amazing (and hilarious too). She first contacted me about doing this a little less than a year ago and with all my over-scheduled-trying-to-do-everything-crazy life right now, it has taken me that long to squeeze each phase of the project in. That's a shame really, because it's this kind of project I love doing the most and I'm so honored to have been asked to play a part in their big day!

Alicia and I share a similar design/work background so it was easy to communicate about the style and layout despite the long-distance now between us. That, and she's just got great taste, obviously. With her to tweak, specify, and reel me in where needed, I drew the design and layout of this 18x24 inch piece which I then embroidered by hand with colors to complement the rest of her wedding scheme.

Ketubah, detail 1

This piece is what is called a ketubah, which is perhaps best described as a marriage contract, and is integral to the Jewish wedding ceremony. Much like a chuppah, the decoration can be very personal and is an important form of ceremonial and religious art. To complete the piece, a calligrapher will fill in their names and date on the banners and the text of the document itself within the central oval. I can't wait to see the finished piece and love that we were able to find a way to use the banners as a bridge to unite the embroidery and calligraphy within the piece.

You're going to get a hint of how crazy I am when I tell you that I've never actually done any embroidery on paper before this...whaa?! I'd read about it, and seen plenty different examples of it, but this was my own first stab at it and so learned a lot along the way. With paper, the process is completely unforgiving, and even more so with such a big piece as this. Luckily, my paranoia helped me keep the paper safe and sound and completely free from scratches, dings, bending, or tears throughout the process. Insert massive sigh of relief here (well, actually that will come once I know it has shipped safely and arrived safe and sound!!).

Ketubah, detail 2


Ketubah, detail 3

Embroidery on paper is also a much slower process because it requires a stabbing rather than a sewing method for the embroidery due to the inflexibility of each stitch. I also had to be a bit picky with the types of stitches I ended up using, keeping in mind what the card stock could support and how many holes could be punched in any one given spot without tearing. The backstitch was a great solution although I think my favorite part are the way the full french knots turned out which you see in the second to last photo. More on all that later though as I'm getting a bit technical here and think I will share a tutorial on basic methods for embroidery on paper with you as soon as I can sort through all the WIP photos I took.

Thanks to Alicia and Jack for entrusting me with this lovely project—may your wedding day be as joyous and beautiful as your life together!

Thursday, July 5, 2012

NEW: Antique Shop Embroidery Pattern (+ A Giveaway!)

"Antique Shop" Embroidery Pattern, detail

I've got my etsy shop back open and a brand new embroidery pattern to share with you that is available! I decided my Vintage Shop pattern needed a counterpart and have been working away at these drawings, trying to come up with the best, most emblematic antique finds. The PDF pattern is
chock full of some of my favorite antique finds including a federal-style couch, a mini-collection of classic Ball jars, a sleek Victorian boot, a candlestick phone, phonograph, bowl and pitcher, calabash pipe complete with wisps of smoke, and an oil lamp, lit and at the ready.

As always, it includes transfer instructions, a color guide, as well as backwards and forward facing versions so you have more  transfer options at the ready!

"Antique Shop" Embroidery Pattern


And for all of you who read down this far, how would you like to win this pattern for your very own?! It's been AGES since I've done a giveaway and so I thought, why the heck not. I'll keep it simple: just leave ONE comment and I will choose a winner at random. If your email is not available in your profile or blog, please leave it since I'll need it to send you the PDF pattern.

I will close the giveaway Saturday at noon and announce a winner at that time so stay tuned and don't forget to share this with all your stitchy friends!

**UPDATE: In order to let more people enter for a chance to win, I am going to leave the giveaway open for one more day and will announce the winner tomorrow *Sunday, July 8th* Instead. Please check back to this same post for the announcement!**


**UPDATE: AND THE WINNER IS...Julie! My husband picked a random number for me out of how many comments there were and so I will be emailing you with a copy of the PDF pattern soon. Thanks to each of you who entered and read along, I appreciate it and hope to see you back here soon  :)

Friday, June 29, 2012

Ava's Double-Sided Baby Blanket

Ava's Blanket, detail

This little receiving blanket was one of the quickest projects I've taken on lately which was a joy and a relief! I started it and finished it in the week before I left to visit family in Michigan as I wanted my new baby niece to have something special, just like her older sister did.

Keeping in mind that the last baby blanket (which, it's occurred to me now, apparently never made it to the blog...weird...) I made saw some serious love and wear (always the best compliment), I decided to keep it simple but elegant. I added a little personalized embroidery to make it special, and then simply sewed around the edges, leaving an app. 2 foot hole where I flipped it right-side-out and ladder stitched the hole closed. No quilting, no tie-offs, just a handy double-sided blanket!

Ava's Blanket

I wanted to make it as versatile as possible so I chose a low-pile minky fabric in cream (so soft! how is it that we do not just swath ourselves in the stuff and walk around like that?!) that perfectly matched the "Dogwood" lightweight linen fabric by April Johnston. I saw it at Joann's and thought it suited my sister-in-law's aesthetic and would work with the embroidery idea I'd hatched...

Ava's Blanket, detail

Above is a close-up of the embroidery, done completely in backstitch. Whenever I use this stitch, I kick myself for not doing so more often because it is so quick and easy. I'm happy with the color scheme—pretty and peaceful for a baby, but not overly girly and cheesy. Just right.

Saturday, June 16, 2012

At Long Last...

Finished at last!

If you've been following me here for a while, you may remember the first glimpses of this quilt from back in  2010. Um, yeah, so that's kind of embarrassing. Life happens though and you get frustrated with the progress and then make a mistake that puts you off it for a while and then you start grad school and then you start working three jobs and then you decide to do some crazy laborious embroidery on the back...you know, the norm.

Detail
I centered the embroidery right at the top so she'd catch a glimpse whenever she snuggles into bed

Well, I managed to finish the binding by hand in one long car ride yesterday that my husband and I just made from Massachusetts to Michigan to visit family. I was bound and determined to be productive as long as I was just going to be sitting in that car for 12+ hours! I finished it just as we came across the border from Canada (having driven about half the distance too and maybe with a bit of a lead foot so that I could get back to sewing...) and GOOD GRIEF was I elatedproudexcitedestatic to say the least. Today I gave it to my three year old niece, as I'd planned all along, and have to admit it was a little hard to let the thing go after all this time. I've done several doll/lap/baby quilts over the years, but never a big one like this, hence all my squeals of joy at having finished it. Definitely enough of a good feeling to spur me on to finishing other projects!!

I know the cool blogger thing is to just show the finished quilt, but my granny, who taught me to sew, always takes one of her with it and I feel that is a tradition well worth honoring so here I am in all my nerdy joy:

Me and my FO

The quilt is twin sized for her big girl bed and is made with Heather Ross' Far Far Away II line in the plum colorway. The backing, sashing, and binding is kona cotton while the purple border is a cotton sateen. I machine pieced and quilted it, but did the binding by hand. You can see the full progress here, from design to quilt top:
Beginnings
Design and progress
Another iron in the fire
The quilt top

Thursday, May 24, 2012

Freshly Stitched

Hand stitched hoop art, detail
up close and personal

This fabric was just crying out to be stitched up and I couldn't resist it's call! The over sized floral print holds up well under detailed hand work, plus it's a great way to keep a bit of that special fabric around as a purely decorative element. Ahem...a good thing when you fall in love with a print and are having a hard time cutting into the stuff.

Once I go crazy embellishing something like this though, I like to display it against a stark calming neutral so that it doesn't end up looking clownish or saccharine-soaked. Whether it's a frame, wall color, or quilt border, the effect works nicely and is something I love to keep in mind with a lot of my pieces since I have such a penchant for vibrant colors.

Hand stitched hoop art

They turned out so bright and cheery and although I love the way they look on their own, I can't wait to try hanging some up as part of a salon style grouping of art in the living room or going up the stairs. These three in particular are available in my shop here so you can add them to your own wall—there are just the three for now though so act fast if they strike your fancy. Each one is completely unique from the others and showcases a variety of different stitches done in thick floss so the unique structure of each really stands out.

Wednesday, November 9, 2011

A Little WIP

Geisha embroidery WIP
pattern from isewcute on etsy

A peek at some embroidery I've been working on here and there while taking the train into Cambridge for class. Like most commuters, I'm in the habit of keeping to myself with my Ipod or book but since I've been working on this, I've had all kinds of people just start talking to me about their grandmothers—a little strange at times, but there was one older gentleman with pink hair who was especially kind and I think it's those kinds of encounters that make me love being in a city the most. Who knew the power of handwork extended to getting steely city subway commuters to open up about such personal subjects?!

As for the embroidery itself, I've really enjoyed all the different stitches and the variation in floss thickness to show some depth, but I'm still not sure how I feel about the color scheme. For my first embroidered face ever though, I'm just going to be satisfied with it on the whole though since I now realize just how hard it is to get an expression to be rendered in a pleasing way with floss!

Monday, October 24, 2011

How to: Quick and Dirty and Transfer Method

A dream is a wish your heart makes...

What better way to avoid finishing my eight page paper than to write a blog post instead? Sounds like perfect sense to me as this way I can get something important done and procrastinate at the same time plus I really am still writing so it's not completely unrelated...right? I feel like I have just discovered a loophole I shouldn't have and it is awesome, muahahaha!

But foreals now, the paper is pretty much done except for some editing and due tomorrow so I feel good about it and find that I am relishing my time blogging and crafting ever so much more these days as it is time that has become all the more rare and precious to come by.

One of the things I've been working on a bit each night is this embroidery that I am doing on the back of the FFAII quilt for my niece (seen here, here, and here). Of course the thought occurred to me just as I was about to start quilting the thing and the only quote that seemed perfect was this rather lengthy bit from the song in Disney's Cinderella...a perfect lullaby for a fairy tale themed quilt I thought and I placed it so that she'll see it on the edge of the underside every time she pulls it up around her. If I can't be there in person, at least this will be!

I copied it out using my own handwriting, scanned and adjusted it a bit on the computer to make sure it was lined up and would fit in the desired area, and then transferred it the quick and dirty way using wax free transfer paper from Seral (it's the best wax free stuff I've found and works on wood, paper, and metal too, but I'm dying to try the non-chalky carbon type). Now I will admit this is not my absolute preferred method but it was already dark out at the time so tracing was not an option for me (someday I will have a lightbox...) and I just didn't feel like working in the pristine way needed for the permanent  iron-on transfer pen. In such cases, it's the fastest and simplest method I've found. Here's how:

1. Place the textile or whatever item you are transferring to on top of a flat hard surface as this will ensure the clearest and darkest marks. Then line up your design where you want it and place the transfer paper between them, colored chalk side down.

2. You can use a pen or pencil to trace over your design but if you're concerned about being able to use it again, use a tracing stylus. A knitting needle is also a much cheaper and handier option that I have found to work quite well!

3. The more you're able to keep your arm up off the paper, the less chalky marks you'll end up with although they will disappear as you start handling it. If your design is small or you're going to be finished with it quickly, you're done at this point.

4. If your design is larger like mine and you're going to be working on it over a period of time, I like to use a water soluble fabric safe marking pen (Dritz makes a variety of them) to go over my design which gives it a bit more definition and gives you something more lasting to go off of as the transfer paper marks fade. As you can see in the very first photo of this post, I like to adjust as I go and any of those extraneous blue marks come right out with a bit of water when you're done.

Quick embroidery tip: after wetting your finished embroidery piece, ALWAYS allow it to air dry and ALWAYS iron it from the back side only. It's a simple precaution to take but will ensure a longer life and will keep the iron from crushing down the stitches you just worked so hard on.

Wednesday, October 12, 2011

Colonial Embroideries at the Boston MFA

Colonial Metallic Embroidery
I could just kick myself for not jotting down the attribution for this piece, but it is silk and metallic hand embroidery on a silk apron if I remember correctly. A metallic embroidered pheonix from the colonial period—pretty friggin rad right?!

I've been spending a lot of my spare time at various area museums lately in order to write papers for my first graduate course and was delighted to see an exhibit of hand embroideries from colonial Boston featured in the MFA's Art of the Americas wing. It was just a little room tucked away in the basement of the museum and I think anyone who might have walked in on me would have thought I was some crazy woman on a sugar high or something, I felt so lucky to have stumbled upon them!

It always makes my heart feel good to see such exquisite historical textiles not only professionally conserved, but taken seriously and displayed in a museum of such stature. I'm afraid my photos from within the low-lit exhibit (gotta protect those delicate fibres) don't do them justice at all, but hopefully they are enough to give you a taste for the rich history of the art form and an idea of what the exhibit offers. It will remain up until June 3, 2012 so I highly recommend seeing it if you're going to be in the Boston area before then!
Petticoat Border
Embroidery attributed to Catherine Woods Brigham, American, born in 1733
Petticoat Border, Boston, Massachusetts, Mid-18th century, Linen plain weave, Embroidered with Wool

It was amazing to see all the individual stitches of a Jacobean style embroidery up close and in person for the first time and the tree of life motif from the border of this petticoat was my absolute favorite. Can you just imagine having that peeking out from your skirts?! Most of the pieces are attributed to Boston school girls and I just stood there wondering in amazement at the incredible articulation of the medium, let alone the idea that these magnificent works adorned everyday items like aprons, seat covers, and petticoats.

Now I've just got to find time to go back and see another exhibit there that just started on the role of vintage textiles from the home front of WWII Britain...is it just me or does that sound pretty much awesome?

Tuesday, August 16, 2011

Chuppah on the Brain

chuppah embroidery

My sister headed back to PA a week ago now...I can't believe it's been that long already and seem to have lost track of time a bit. I was the lame big sister tearing up (and laughing at the same time) in Boston's South Station as she caught an early morning train home and then balling on the drive home. After picking myself up and having a good laugh at myself, I got to work straight away and have been immersed in The Chuppah Project ever since. Finally...I am in the embroidery stage!! To get to this point though, I've been tracing, moving furniture, hanging, and painting while my husband carted home a mac friendly projection unit he was able to borrow from work...totally saved the day  as I wasn't having any luck locating one.

Here are snippets of the process from the past week as I tried to document along the way...

tracing
My totally glamorous self, tracing the design onto the chuppah.

 Mixing colors was my favorite part of several college painting courses. I loved the challenge of creating an exact shade with unusual combos. This was done using Versatex silk screening paints for permanence.

We had wanted to try some fabric applique but went with all fabric painting in the end due to the herculean effort that would have required on a piece of this size with the time constraints given. I decided an opaque paint on the leaves and berries could help them to still stand out in a similar way and did the trunk in a watercolor—very tricky to apply on fabric but a nice effect.

chuppah painting, wip
One days work...almost there!

chuppah painting
Painting trees on chuppahs in the living room...that's how we roll around here.

 Not the best shot, but I've been finding it quite tricky to shoot the entire thing at once. The embroidery will outline text in the bottom panel and each berry and leaf in different stitches and colors to accent each element and add a lot more depth and character to the trunk which looks a bit drab here without it. I am really happy with the stitching I've done on it so far and how much definition it is adding though. Once I get a chunk of it done, I'll come up for air and share again!


P.S. Alas, I have decided it's time for watermarks. I strive for all original content on my blog and after a slew of incidents that made me think a bit more about protecting my photos/work and hearing from customers again and again that they were seeing my work but were having a hard time knowing where to find me, it seemed the best route to take. I've tried to make it as unassuming and unobtrusive as possible and hope you don't mind as I take this step to bolster my content.

Thursday, July 28, 2011

Cute Overload.

Flowergirl Embroidered Converse

When these shoes arrived in the mail, I couldn't help but ooo and ahh and generally fawn over them as if I was someone's crazy aunt, known family wide for her cheek pinching penchant. What is it about little one's shoes that trigger seemingly uncontrollable googly eyed reactions in us?! If that wasn't enough, they became doubly adorable with the embroidery I did for this customer—one pair for her flowergirl and the other for her ringbearer. I can only imagine how nervous or weirded out a kid might feel walking in formal clothes in front of so many people and think these shoes are the perfect little gift to kickstart their confidence and comfort level on such a big day!

Kid's keepsake shoes
As I worked on them, I got to thinking that they'd also be a fabulous fresh take on those bronzed booties of old, embroidered with their name and birth date and hung in the nursery or handed down as a keepsake.

Ok, I think that should cover any cute deficiency anyone may have been experiencing. I declare you cured and encourage you to check out more pictures of these shoes here and here if you experience any relapses.

P.S. Today marks 273 posts and 173 followers—thank you!

Tuesday, July 19, 2011

New and Improved

new sachet designs
new pine and rose sachets

New sachet designs and scents are now in the shop! Having started out with just a lavender sachet, I decided it was high time to expand a bit and include more scents—a fresh and woodsy American balsam fir and a delicately classic pink rose from India.

These sachets are great as they lend their scent to what is around them but not in an overpowering way because they are filled with natural dried plants and herbs, not heavy asthma inducing fragrances. I've selected colors and created designs which coordinate with each of the scents that have their own unique uses and character:

Lavender: wonderfully calming and relaxing, this sachet is perfect for tucking into your pillowcase to lull you, your child, or house guests to sleep. For even more of an impact, try placing several sachets in the linen closet between blankets and sheets so, when in use, they wrap you in their soothing scent. As someone who's dealt with many sleepless nights of insomnia, I've got to say this trick has definitely come in handy.

Rose: gently uplifting, rose is ultra feminine and glamorous with a vintage appeal. What better use than to place a sachet or two in your lingerie drawer or even in your suitcase on a trip to keep clothing fresh from day to day when you may be wearing them more than once before being able to launder them.

Pine: reminiscent of cabins, winter holidays, and summer bonfires all at once, pine is an invigorating and earthy scent that is a great substitute for mothballs as a way to keep clothes fresh that you are storing out of season. Also, since it's not a "frilly" smell, it's gender neutral and can be used to freshen bathroom towels that anyone in the house might use.

embroidered sachets
 hand embroidered sachets from The Story of Kat

In addition to these uses, they can be hung from hangers in the closet, door knobs, or as a decorative element on the wall as each one now includes a matching ribbon loop at the top. See, I told you they were going to be new and improved!

Friday, June 17, 2011

A Bit of Stitching and a Bit of Home

Michigan embroidery, detail
state flower pattern by Aunt Martha

It's usually this time of year when I am missing home the most. I used to love lying in the backyard hammock as our dog Georgie, an airdale, napped beneath it and I would read there once school got out and watch as my mom planted and weeded her vegetable garden. Well, sometimes my lethargic teenage self was roped into helping out with all sorts of farm chores but I was bound and determined to spend as much of my free time as possible reading in that hammock or in my favorite tree in the lane behind the pasture and sometimes I daydream about how nice it would be to be able to slip back into one of those summer days, if only for a moment.

I thought a lot about those summer days as I stitched up this piece with it's apple blossoms and state banner. It was a project I started long ago and far away and one of those things that's been lingering on my sewing to-do list for quite a while. I know, it's shameful to be finally finishing something in June that was originally going to be a christmas gift but hey, when your job is to stitch for a living, the personal projects sometimes just have to be put on the back burner. The finished pillow will now go live with my parent's in their knotty pine living room—fitting right? It doesn't quite go with my usual style but I do like it and think I might do something like it if I had a cabin in the woods or on the great lakes (definitely on my list of next to impossible dreams).

Michigan pillow
Can I just add how much I love the stem stitch for outlining organic things like leaves and petals and flames? I find I need to put a little more concentration into it than I do with the backstitch (used on the banner) or the split stitch (used for the veins and twigs), but it is totally worth it for things like that. I also brought the blossoms to the forefront by using all six strands and only three on the elements that I wanted to push into the background. This is a great way to give depth to any embroidered piece as well as more of a dynamic texture.

Ahem....what I do not recommend though is hoping for seams that match up perfectly when sewing with plaid. I ended up using my seam ripper a few more times than I would care to admit and had to settle for getting the lines of the plaid to match up as closely as possible, but not quite spot on in some places. If anyone knows how that is accomplished, please let me know because the darn stuff kind of makesmewanttopullmyhairoutandthrowabonifidetempertamtrum. Ok, ok I did not loose it over plaid (and I suppose I must admit to battling my inner perfectionist) but I was briefly tempted and am thinking that taking a bit of time to read in a hammock afterwards might not be such a bad idea!

Monday, May 30, 2011

Off to College Embroidery Pattern

Off to College Embroidery Pattern

Delivered hot n' fresh to you on this holiday weekend: my new "Off to College" embroidery pattern, now available in the shop!

As usual, the designs are my own original artwork and this one's got a handful of quintessential collegiate items such as a vintage street bicycle (based on a combination of my own bike and a Papillionaire), pen, #2 pencil, textbooks, ruled paper, composition notebook (an ode to my obsession with Harriet the Spy as a kid), school pennant, and a typewriter complete with all the keys and a bit of paper that's been rolled in and is just waiting for you (can you hear the tap tap tapping of those slick little keys?).

Off to College Embroidery Pattern, detail
detail of my pattern sample

I'm a sucker for the nerdy details of each item with all it's bells and whistles but I also like for them to maintain the charm of the hand drawn original with it's slight imperfections. My goal then is to strike a balance in my patterns between technical accuracy and clarity so that each item is at once interesting but feasible for the novice to advanced stitcher. Depending on how practiced you are, you can stitch up each design in more and more complex ways to include as much or as little embellishment as you like.

How would you stitch this pattern up? Have you seen the quilts given at graduation open houses where all the guests write memories and well wishes on blank squares within a finished quilt using a permanent fabric pen? I'd love to see the designs in this pattern stitched up and incorporated into such a quilt to give as a going away gift for a grad's dorm room!

Tuesday, April 19, 2011

An Experiment in Jacobean Crewelwork

jacobean crewelwork
my little faux crewel weekend project

Embroidery started as something I'd toyed with since childhood (sometime I should show you the flowers on the strap of my backpack from middle school...they're terrible but cute) and it has slowly but surely burgeoned into an obsession. Over time, it has simply become a way of life and there's not a week that goes by now when I'm not working on a personal piece or one for the shop.

Mostly, I've worked on modern line-based illustration pieces but I've been getting more and more interested in elaborate traditional styles and their history as an art form. There are so many areas to be explored but recently I've become quite enamoured with Jacobean crewelwork (and spent an entire night trying to convince my husband to move to southwest London so that I could start classes towards a foundation degree at the Royal School of Needlework...someday because now it's on my bucket list). I guess it's the art historian in me, but I love trying to discover the way in which different art forms have come into their own, the way each important piece establishes a dialogue between artists going back and forth throughout history, and how those pieces reflect on the continued development of the art form and the society that produces it.

Jacobean crewelwork initially interested me because it is so ornate and I love that it gives such priority to form and color—no surprise there if you've been following my work for a while. I also love that this type of embroidery is completely inseparable from the visual theme it has always played off of, known as the tree of life (which is also a religious and philosophical belief in the interconnectedness of all living things) wherein the highly stylized florals intertwine and are often accented by animals, vines, and leaves without a formalized single scale or perspective. You can recognize it in many Scandinavian and early American embroidered pieces (edit: as well as in medieval illuminated manuscripts and clothing of Elizabethan nobility when it was first developed as needlework inspired by flora and fauna from "The Orient," as it was then known) and I decided to base my first experiment (in the photos here) on a vintage piece from the 1970's which "riffed" off of the traditional motif but used much more modern and bright colors.

jacobean crewelwork, detail
crewel embroidery experiment, detail

Since I had no crewel wool on hand or a pattern for that matter, I drew mine by "eyeballing" the vintage piece and substituted everyday canvas and cotton embroidery floss. I'm a firm believer in learning the "rules" for any art form so that you know how to break them with purpose and style down the road, but I was so excited, I just had to commit something to fabric right away, even if it was very simple and not at all authentic. I spent a good 8 hours completing this miniature work on a 3 inch embroidery hoop (thanks to watching one movie a night for three nights in a row) and have plans to incorporate it into a grouping of items going up our staircase that I want to hang salon style. Unfortunately, that kind of time commitment doesn't really make it something I could sell on etsy (darn you etsy and your constant undervaluing of handmade goods!), but I want to keep experimenting to see if there is a way I can do it because I really enjoyed it and feel it meshes well with the rest of my work while also being something new.

In the meantime, I'm definitely going to save up for some proper crewel wool and this fabulous looking book from the folks at RSN!